,


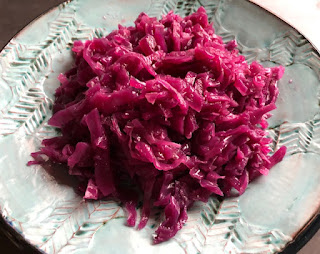
Sweet and Sour Red Cabbage with Apple


I’ve been making this dish for many years, typically to accompany a roast of pork or turkey. For the last fifteen years or so we have sold it by the quart at the restaurant as a side dish with roasted turkeys and other Thanksgiving items that many of our customers order for the holiday. 

I first encountered this bright and beautiful treat in college at the classy demonstration cafeteria run by the School of Home Economics, where they called it “Belgian Red Cabbage.” I’ve since learned that sweet and sour red cabbage, often with apple, is prepared in northern Germany, Denmark, and Czech Republic, and elsewhere in central and northern Europe. I actually had it at a Czech restaurant in East Berlin, where it came with roasted goose and potato dumplings.

Here’s how I make it.

1 medium red cabbage

1 large apple

10 whole allspice berries

4-inch strip of orange zest, peeled preferably from an organic or well-scrubbed orange

1/2 cup water

1/2 teaspoon salt, plus more to taste

1/4 teaspoon black pepper

5 tablespoons cider vinegar

4 tablespoons sugar

Quarter the cabbage, cut out and discard the core. Shred cabbage finely (this can be done with a 2-milometer blade in a food processor or mandolin). Peel, quarter, and core the apple and chop the quarters into small pieces. The orange zest and allspice berries can be tied in a small cheesecloth bag for easy removal later.

In a stainless steel or enamel (not aluminum or cast iron) pot bring the cabbage, apples, allspice, orange peel, pepper, salt, and 1/2 cup water to a boil. Simmer, covered, stirring from time to time and adding a little water to keep some liquid on the bottom of the pan. Cook until cabbage is tender and the apple has broken up (about 20 min). 

Remove the cheesecloth bag or if it wasn’t used remove the orange peel and allspice berries as you see them. Add the vinegar and sugar plus salt to taste. Simmer about 5 minutes. The color will become a bright crimson red. Taste and add more sugar, vinegar, and/or salt to your taste. The flavor should be delicately sweet-sour.

The dish is best if made ahead and reheated to serve. Re-check the salt before serving.


,


Blueberry Bread Pudding with Raspberry Sauce


Here’s a recipe for a fruited bread pudding that I developed for my pre-teen cooking class recently. The method is somewhat simplified in terms of the baking method, not using a pan of hot water in which the pudding pan sits.

Pudding:

10 cups, fairly packed, cubed (see below) baguette or sandwich bread (one large loaf)
4 eggs
3 1/2 cups whole milk
3/4 cup brown sugar
1 teaspoon vanilla
3/4 teaspoon salt
1/2 teaspoon cinnamon
1/4 teaspoon nutmeg
3 to 4 tablespoons melted butter (easiest in a cup in microwave)
1 cup blueberries, fresh or frozen
1/4 cup pecans (optional), coarsely chopped

Sauce:

1/2 cup raspberry preserves (can put through a sieve if you want to get rid of seeds)

3/4 cup water

Pinch of salt

2 teaspoons brown sugar

2 teaspoons lemon juice

1/2 teaspoon cornstarch

1 teaspoon butter


Heat oven to 375 degrees.

Do not cut off bread crusts, but slice bread if not already sliced, then stack up a few slices at a time and cut into 1-inch squares. Separately, in large bowl, whisk eggs lightly. Mix in milk, sugar, seasonings, and melted butter. Stir in bread. Let sit five minutes then stir again. Stir in blueberries, and pecans, if used.

Generously butter 10-inch round casserole or high-sided cake pan, or 9 by 13-inch pan. Fill with mixture and smooth top. Cover with waxed paper or parchment, then aluminum foil.

Bake 40 minutes. Uncover and bake 10 or more minutes to dry top, and until pudding tests done. (Edges pull away from pan; center should be slightly springy to the touch. A sharp knife inserted near the center comes out clean.) Remove from oven.

Whisk sauce ingredients, other than butter, in a small pan. Add butter. Simmer sauce ingredients 1 minute, stirring with a whisk. With 2-prong fork poke holes into still-hot pudding here and there and spoon sauce on so it soaks in.

The pudding can be eaten warm. Or cool, cover with plastic wrap. Serve cold, or slightly warmed (in microwave, for example). Nice topped with whipped cream or a small scoop of vanilla ice cream.

,


“Wild” Mushrooms sautéed with Goat Cheese (and optional Ham) on a “Planche”
 

Suddenly, some people, including our son-in-law Jason, are growing shiitake mushrooms at home. Locally grown ones are also often available in Georgia in fancier supermarkets, produce markets, as well as Asian grocery shops. Here’s a way of serving them like the French prepare seasonal wild mushrooms, typically as a starter course.

The dish is patterned after a specialty of Louisiana-born and French-restaurant experienced Chef Joe Truex, formerly with Watershed, in Decatur, Georgia. It serves as a starter or a light lunch or supper. 

The “Planche” is a long, diagonally cut slice of French baguette buttered on both sides and fried until golden. English muffins split in half are a readily available substitute. The “wild” mushrooms are either fresh shiitake or a combination of shiitake and oyster mushrooms. But locally collected chanterelles, “Hen of the Forest,” or morels would be more authentic. The ham is optional, but makes the dish richer in flavor. Country ham was Joe Truex’s choice, but smoked ham from the deli counter works well. The ham is easily chopped finely, or minced, on a cutting board with a chef’s knife. 

The recipe serves 4 to 6, depending on how the dish is used in the meal. 

Mushrooms

1 pound shiitake mushrooms or a mixture of small fresh shiitake and oyster mushrooms

2 tablespoons minced country ham or smoked ham (1-2 slices from deli counter) -- optional

1 tablespoon minced shallot or green onion

2 tablespoons olive oil

3 tablespoons white wine

3 tablespoons water, plus more as needed

4-6 ounces soft goat cheese

Salt, if needed (may not be needed if using salty ham)

Juice of 1/2 of a small-medium lemon

Minced parsley for garnish 

Planches

4-6 slices baguette cut 1/2-inch thick on a long, flat bias to make oval slices 4 to 6 inches long (or split English muffins)

Butter for the bread

Prepare ingredients for mushrooms. Rinse mushrooms, and for shiitakes, cut off stems. Slice mushrooms about 1/2-inch wide. Mince the ham, if used. Mince shallot or green onion. Have other ingredients ready. 

Slice the bread into the number of
planches needed, or use one English muffin, split, per person. Lightly butter both sides. Fry them gently in a wide frying pan on both sides until golden. Set on serving plates. 

Reheat frying pan. Gently fry minced ham, if used, and shallot or green onion in olive oil until shallot is softened. Add mushrooms and stir and fry until looking slightly softened. Add wine and water, and simmer, stirring frequently, until liquid is reduced to half. 

Stir in goat cheese, until melted. If sauce is thick add a little water. Remove from heat. Taste for salt, and add a little if needed. Squeeze in lemon juice. Mix briefly. 

Spoon mixture onto the fried planches. Dust lightly with minced parsley. 

,


French Lentil Salad

Here's a traditional salad from France, a “salade de lentilles” [sah-'lahd deh lawn-'tee]). Originally for winter when produce was scarce, the dish is tangy enough for any season. My updated recipe includes fresh vegetables for color and brighter taste. The red and green highlights beautify the dish for buffets, especially at Christmas. Lentil salad can serve as a side dish, or be offered as an appetizer if spooned onto lettuce leaves. It can even be spread onto toasted sliced baguette, bruschetta, or crackers as hors d'oevres.

Most supermarkets carry one-pound bags of tan-green lentils. These are fine for this salad. The recipe serves six or more as an appetizer or side dish. It’s best made ahead; leftovers keep well refrigerated for several days.

1/2 pound (1 cup) dry tan-green lentils

1 small bay leaf

1 medium clove of garlic, bruised

1 teaspoon salt, divided

1/4 teaspoon black pepper, divided

3 tablespoons wine vinegar or lemon juice

2 tablespoons olive oil

1 large scallion (green onion), or 2 tablespoons minced red onion

2 small-medium tomatoes or 1 cup grape tomatoes

2 tablespoons chopped parsley

1 extra tomato or 8-10 grape tomatoes plus parsley sprigs for garnish


Pick over lentils. Soak them in plenty of boiling water for 20 minutes. Drain.

Place lentils in a pot, add water to just cover, and return to a boil. Reduce to simmer. Skim off foam. Stir in bay leaf, garlic, 1/2 teaspoon salt, and 1/8 teaspoon black pepper. Simmer, uncovered, just at the edge of a boil. Stir gently from time to time and add a little water, if needed, to keep the liquid level at the surface of the lentils. Cook just until just tender (15-20 minutes), testing a few lentils by biting them.

Drain in colander (the juice can be used in soups or stews), shaking it gently. Transfer lentils to a large bowl to cool, and stir gently from time to time. Remove bay leaf and garlic.

Stir in vinegar or lemon juice, olive oil, about 1/4 teaspoon salt, plus 1/8 teaspoon pepper. For scallion, slice white and green portions very thinly; or use finely minced onion. Stir scallion or onion into lentils. Allow mixture to sit at least ten minutes. Taste, and add salt if needed. The salad is best if refrigerated 8 hours or more.

Before serving, taste again and add vinegar or lemon juice and/or salt if necessary. Cut tomatoes into small pieces and chop parsley. Stir both into lentils, plus a little salt for the tomato. Serve in shallow bowl or heaped up on platter. Garnish with the additional tomato, sliced, or grape tomatoes, halved, and sprigs of parsley.

,


Pork braised with Nectarines or Plums, a Summer Treat 

Bowl by Maria Dondero, Southern Star Studio, Athens GA 
Pork is certainly the meat that pairs best with fruit, or with sweetness, in cooking, with many great examples. A distant second meat for cooking with fruit would be duck (such as French Duck á l’Orange), but Americans don’t use duck much. In North Africa, lamb is sometimes braised with fruit and sweetness, as in Moroccan Tagines. Beef and chicken rarely go with fruit, in my experience. 

With nectarines becoming available in the summer, here’s one of my favorite dishes using pork with fruit, Pork braised with Nectarine. Plums, particularly dark colored prune plums in late summer, are also good. This delightful, and satisfyingly hearty, pork-fruit combination goes well with buttered noodles, potatoes or rice, set off with crisp-tender broccoli or a green salad. A chilled dry to off-dry rosé would be my choice of wine to have with this..

The recipe serves six. 

2 pounds lean pork, tenderloin, “country ribs,” or butt preferred

3/4 teaspoon salt for meat, plus 1/2 teaspoon for cooking

1/4 teaspoon black pepper

1 small onion, finely diced

1/4 cup red wine

1 pound nectarines (or plums)

1/2 cup water, plus more as needed

1/2 teaspoon paprika

1/4 teaspoon oregano

Pinch of cayenne

Chopped or whole sprigs of parsley for garnish, optional

Sour cream, optional

Trim (but save) excess fat from pork. Cut meat in 1-1/4 inch chunks. Include bone if using “country ribs.” Season meat with salt and pepper. Wash nectarines or plums but do not peel them. Cut flesh off the pits and chop it finely by hand or in food processor. 

Render (melt) fat trimmings in cooking pot. Discard cracklings. Pour off (but save) all except 3 tablespoons grease, or add olive or vegetable oil as needed. Fry pork, half at a time, in the pot, until just starting to brown, adding a little more grease if needed. Remove to a bowl with slotted spoon. 

Fry diced onions in the pot, adding a little grease if needed, until softened and starting to brown. Add fried meat plus wine. Bring to a boil, stirring frequently. Add chopped nectarines or plums, water, 1/2 teaspoon salt, the paprika, oregano and cayenne. 

Simmer covered, stirring occasionally and pushing meat down into the liquid, until meat is tender, adding a little water if sauce becomes dry (15-20 minutes for tenderloin up to 30-45 minutes for country ribs or butt). Taste during cooking and add salt as needed. 

When serving, optionally garnish with chopped or whole sprigs of parsley. Top with a little sour cream, if desired.

,


Thai Chili-Lime Fish (Pla Prik Manau) can be super-hot 

The hottest authentic dish I’ve ever encountered was in Thailand, where fried fish showed up coated thickly with what looked like chopped raw green chilies. 

Called “Prik Manao” [PRIK ma-NOW], the packed-on topping simply means hot pepper and lime. Raw green – or red – chilies and lime juice are two main ingredients, along with plentiful raw garlic, Thai fish sauce, cilantro leaves and a bit of sugar. It’s surprisingly delicious. I’ve toned down the heat in the recipe. 

The traditional fish for this would have been a white-fleshed ocean fish (I love grouper), but nowadays salmon shows up everywhere, and aside from the color seem just like delicious Thai fish. Once, in a hurry, I cheated and put the sauce over baked supermarket crunchy fish fingers -- with relative success. 

The recipe makes enough for six. Accompany this with unsalted white rice, preferably jasmine rice, and a stir-fried vegetable dish. A cold white wine with faint sweetness goes particularly well with the dish. 

Prepare the sauce before cooking the fish:

3 large green or red jalapeño peppers (use fewer, or remove part of seeds for milder sauce)

5 large cloves garlic

1/2 cup cilantro leaves, loosely packed and including a bit of stem

3 tablespoons freshly squeezed lime juice, plus to taste

1 1/2 teaspoons Thai fish sauce, plus to taste

1 teaspoon sugar, plus to taste 

Cut stems off peppers and peel garlic. Mince peppers (including seeds and membranes for authenticity) and garlic finely on cutting board with chef’s knife or pulse them till finely minced, but not pureed, in food processor. (Be careful handling the chilies, or wear a plastic glove.) 

Place minced pepper and garlic in bowl. Chop, but do not mince, cilantro, and add it to mixture. Add remaining ingredients and mix well. 

Taste (it’s hot) and add lime juice, fish sauce (for salt) and/or sugar to taste. Let sauce rest, stirring occasionally, at least half an hour. 

Fish:

6 servings fish, such as grouper or tilapia (thawed just before cooking, if frozen), or salmon

Salt for fish

Flour or rice flour for dusting

Canola or vegetable (not olive) for frying 

Dry fish with paper towel. Sprinkle lightly with salt on both sides. Heat frying pan or griddle to medium hot. Add 1/8 inch of oil. 

Dust fish lightly on both sides with flour or rice flour. Fry half the fish at a time, turning carefully, until just cooked through. Place on platter and fry the remaining fish. 

Spoon most of the sauce over the fish pieces, evening it out to cover the fish. Serve leftover sauce in a side dish. Accompany with unsalted white rice.

,


Jerk Chicken is a savory Jamaican favorite

What could be more Jamaican than Jerk Chicken? Actually it dates only from the 1960s. As a student in the mid-60s, I spent two 3-month summers based at the University of the West Indies in Mona (Kingston), Jamaica. I didn’t encounter jerk and I didn’t hear Bob Marley or Reggae. These cultural phenomena were, in retrospect, already there, but not yet widely recognized. 

Jerk cooking, or “jerking,” evolved from the slow fire-roasting of meat practiced by Jamaica’s indigenous Taíno Indians. In its modern form, jerk emerged in rural Jamaica, where roadside vendors would rub meats, especially goat and pork, with spices and peppers, and grill them over smoldering wood or charcoal in halved oil drums. 

Allspice, the dried berry of the Jamaican “Bay” tree, is the only true spice native to the Western Hemisphere. It is nearly invariable as a jerk seasoning . The other constant is the fiery “Scotch Bonnet” pepper. I use cayenne for convenience. 

While whole chicken is traditional, I use leg quarters or just thighs. For moistness, the chicken should have the bones in. Removing the skin is optional, but healthier. The rub should be applied 12 to 24 hours before cooking. I roast in the oven rather than on the grill. 

The recipe serves six or more. 

Season chicken one day ahead:
6 large chicken leg quarters or 12 large thighs with skin and bone
1 tablespoon salt
2 teaspoons ground allspice
1 1/2 teaspoons paprika
1 1/2 teaspoons garlic salt
1 teaspoon ground black pepper
3/4 teaspoon cumin
1/2 teaspoon thyme
1/2 teaspoon ground celery seed (not celery salt)
3/8 to 3/4 teaspoon (or more) cayenne
1-1/2 tablespoons vinegar or lime juice
3 tablespoons vegetable oil

Remove skin from chicken and trim off excess fat. Cut thighs from drumsticks if using leg quarters. Rinse chicken pieces and pat dry with paper towels. Slash flesh in a few places. Mix remaining ingredients other than the oil. Rub well into chicken on all surfaces.
 

Finally, rub everything with oil. Place chicken in zip-lock plastic bag and refrigerate 12 to 24 hours, squeezing bag from time to time to baste with the accumulated juices.

Set oven for 360 degrees. Arrange a “cake” rack on a sheet pan. Place chicken pieces upside down on rack. Discard marinade. Roast 20 minutes on upper shelf of oven.

Turn pieces over. Roast an additional 20-30 minutes, turning occasionally. The chicken should be well cooked, and show no pinkness when a knife tip is inserted and twisted.

Serve with a seasoned rice dish, and a slightly sweet shredded cabbage salad.

,


Gazpacho Andaluz -- cold Spanish summer soup


The origins of gazpacho go back to the Arab-Moorish period in Spain, long before tomatoes and peppers were introduced to Europe from the Americas. It appears to have been a cold soup made from cucumbers and onion, olive oil, lemon juice, herbs, plus ground almonds and stale bread to give it body. The recipe here retains much of the original, but includes the tomato and pepper that now seem to make gazpacho gazpacho. This recipe serves six generously.

1 medium-small red (preferred) or green sweet bell pepper

2 small pickling cucumbers or 1/2 of a regular cucumber

1 small onion or 3 scallions (green onions)

4-inch piece of celery

1 small clove garlic

3 large slices stale white bread, such as baguette

1 1/2 cups water

1 large (28-ounce) can whole or diced tomatoes in puree (without basil)

1/4 cup ground almonds or almond butter

1/4 teaspoon hot pepper sauce or to taste, or a large pinch of cayenne

1 1/2 tablespoons fresh lemon juice, or to taste

1 1/2 teaspoons salt, or more to taste

1/4 teaspoon black pepper

3 tablespoons olive oil

1 cup ice cubes

Freshly diced tomato and minced parsley, and olive oil for garnish


Core and remove pith from pepper; cut flesh into coarse pieces. Peel cucumber if skin is tough or waxed, quarter it lengthwise and remove seeds if large. Cut flesh into chunks. Peel onion and cut it into chunks, or remove roots from scallions and cut white and green parts into roughly 1-inch lengths.

Place celery, cut in several pieces, and the garlic, peeled, in the food processor. Pulse on and off to chop. Scraping down inside of processor bowl from time to time. Add onion or scallion, cucumber, and red or green pepper. Pulse to chop finely. Tear bread in small pieces and add it and the water to the processor and run it briefly to puree the bread. Transfer to a mixing bowl. 

Add tomatoes, ground almonds, pepper sauce or cayenne, lemon juice, salt, pepper and olive oil to the processor. Run processor to make a coarse soupy mixture. Add ice and process again. Add this mixture to the bowl with the previous ingredients, and mix well. Taste and adjust salt and lemon juice and other seasonings to taste. If mixture is too thick, dilute with water to a creamy consistency. Refrigerate at least 1/2 hour (or up to 3 days). 

Before serving, stir well, taste again and adjust salt and lemon juice if necessary. Serve in individual bowls (or wine glasses) garnished with a little diced tomato and parsley, plus a drizzle of olive oil.

,


Watermelon and Feta for a refreshing summer salad

Fresh, cool, watermelon dotted with salty feta cheese sets up taste sensations that stimulate even the heat-jaded palate. Drizzle it all with lemon- and jalapeño-infused dressing and add a little arugula, and all the tastes are covered: sweet, sour, bitter, salty and chili hot. Even better, it’s beautiful!

My first experience of watermelon paired with tangy cheese was Hugh Acheson’s summer salad of local watermelon wedges interspersed with locally made goat cheese at the Five and Ten, here in Athens, Georgia. I later learned that watermelon with feta cheese is an established Greek specialty, as is feta paired with fresh figs.

But whether an “unlikely” food pairing was already thought of is beside the point. What makes a particular chef’s dish unique is the sourcing and quality of the ingredients, the subtle extra touches and the presentation.

The availability of “seedless” watermelon makes dishes with the fruit simpler to prepare and easier to eat than in the old days. I find pure olive oil heavy for dressing this salad, and use predominantly sunflower or canola oil with a little olive oil. Lemon zest and a little hot pepper infused briefly into the oil add subtlety. Either lemon juice or balsamic vinegar can supply the tartness.

The recipe serves six, either using separate salad plates or a larger platter.

3 tablespoons sunflower or canola oil

1 tablespoon extra virgin olive oil

3 lengthwise strips lemon zest, cut from lemon with vegetable peeler

8 thin slices jalapeño pepper

2 tablespoons lemon juice or balsamic vinegar

1/8 teaspoon salt

Approximately 3 pounds “seedless” watermelon (half of a medium-small one)

Approximately 1 1/2 cups arugula, rinsed and drained

1/2 cup crumbled feta cheese


In a bowl, make dressing by combining oils, zest and pepper slices. Bruise zest and pepper with back of a spoon. Stir in lemon juice or balsamic plus salt. After 20 minutes, lift out zest and pepper with fork.

Cut off rind and slice watermelon to desired thickness: 1/4 inch for triangles, 3/4 inch for chunks. Cut either into 2-by-3 inch triangles or 3/4-inch chunks.

Place bed of arugula on salad plates or serving platter. Stack up watermelon attractively on arugula. Sprinkle crumbled feta over and between watermelon pieces. Drizzle dressing evenly over the top.

,


 Pesto with Pasta – The Classic Dish from Genoa

The region of Genoa, on the northwestern coast of Italy, is home to that great basil, garlic, cheese and pine nut sauce, “pesto,” called “pesto alla genovese” in Italian.

Fettuccini al Pesto alla genovese
Genoa was also home to the navigator Christopher Columbus, who sailed for the Spanish Crown. We don’t know his food preferences. Less auspiciously, Genoa is also the ancestral home of the Donderos, including my great-grandfather, Joseph Francis Dondero, who sailed from there to America in the mid-19th century. His pesto recipe – if he had one – was not handed down through the family.

The name “pesto” comes from the Latin for “pounded” or “crushed,” since the ingredients were originally pounded together in a marble mortar and pestle. The word “pestle” has the same linguistic origin.

Despite variations, including a delicious Sicilian red “pesto rosso,” made from dried tomatoes and almonds, and an arugula pesto, basil-based pesto remains the classic. A milder but still authentic version, which I prefer, replaces 1/4 of that herb with fresh parsley. There is also a relative of pesto, “pistou,” in Provence, on the French Mediterranean coast near to Genoa. French pistou does not use pine nuts and may or may not contain cheese.

Genovese Basil in our garden
Ideally the basil for pesto should be young and of the large-leaved “Genovese” variety. Now in early June in Georgia, that basil is at its peak. As pine nuts (“pignoli”) are expensive, walnuts are sometimes substituted. (I also get a reaction to at least some pine nuts, which I used to love, with my taste being distorted to bitter for a week or two afterwards.) The cheese for pesto is traditionally either Pecorino Romano, Pecorino Sardo, or Parmesan.

Though better when freshly made, pesto can be refrigerated for up to a week. An added layer of olive oil over the surface slows the color from browning. If freezing pesto for later use, omit the cheese and add it just before serving.

A traditional pasta for pesto is “trenette,” long flat noodles often made with eggs. Fettuccini is an available substitute. In the region of Genoa, potato and green beans are sometimes cooked in with the pasta. Pesto is also served with potato gnocchi, which are little fork-scored dumplings, and sometimes with that charmingly named pasta, “strozza preti” -- priest stranglers.

Traditionally, just before use, pesto is diluted with a little boiling water from the cooking pasta. The pasta is drained then tossed with the pesto in large serving bowl and topped with additional grated cheese.

The recipe makes enough dressed pasta for six people.


Pesto with Pasta

1-1/2 cups fresh basil leaves, lightly packed
1/2 cup parsley leaves, flat “Italian” type preferred, lightly packed
3 tablespoons pine nuts, or walnuts (lightly toasted – see below)
2 cloves garlic
1/2 cup extra virgin olive oil
1 teaspoon salt
5/8 cup grated Romano or Parmesan cheese, or a mixture, plus extra for garnish
Salt for boiling the pasta
2 medium potatoes, peeled and cut in 1/2-inch chunks
1/4 pound green beans (optional), cut in 1-inch lengths
1 pound fresh pasta, if available, or 12 ounces dry


Put basil, parsley, pine nuts or walnuts (toast walnuts about 3 minutes on a plate in the microwave), garlic, oil, and salt in a blender or food processor. Pulse it a number of times, scraping down the container with a spatula. Do not purée the herbs, but chop them until they are tiny specks. Remove the mixture to a bowl. Stir in the cheese.

Bring a large pot of water to a boil. Add 2 tablespoons salt. If using fresh pasta, which cooks more quickly, add potatoes and green beans if used, and bring water back to a boil. Add the fresh pasta and stir immediately so it does not stick together. If using dry pasta, add it, the potatoes and green beans, if used, together to the boiling water and stir immediately so pasta doesn’t stick together. Either way, let boil, stirring frequently. While pasta is cooking, remove 1/2 cup of the pasta-boiling water and stir it into the pesto.

When pasta is tender to the bite, drain it in a colander, shaking briefly, and transfer it to a large serving bowl. Toss pasta with the diluted pesto. Sprinkle with a little more cheese.


,


Greek-Style Orzo Pasta Salad

This dish grew out of a momentary thought a few years ago when a local hospital ordered a buffet catering meal from us that was for a public reception. One of the tricks for serving a crowd at modest cost is a huge bowl of pasta salad, which was among the dishes the hospital ordered.

Greek Orzo Pasta Salad, without Feta Cheese
Instead of my standard sort of pesto-seasoned pasta salad I suddenly thought to use the ingredients around that I had just made a conventional Greek salad with for a different order, Kalamata olives, pickled peppers, tomatoes, red onions, wine vinegar, oregano, olive oil, feta cheese. Happily, the huge bowl of penne I dressed with all these ingredients tasted tangy and good. More important, the Administrator of the hospital loved the salad, and it was always requested as we catered more events for them. We added it as a standard item for our general catering, special orders, and the deli case.

Here is a version of the salad with an even shorter pasta than penne. Orzo, shaped like rice grains, actually means “barley” in Italian (though the pasta is sometimes called “risoni” in Italy, meaning large [grains of] rice). The result looks like a Mediterranean rice salad, at least if not covered with crumbled feta cheese.

I use the herb sumac in the dressing, which I first learned about when I cooked with Turkish chef friends in Decatur. But sumac actually originated in Greece and, reportedly, is used with meats there as well as throughout the Eastern Mediterranean. A little paprika can be substituted if sumac is not available. Feta cheese is optional, being a bit heavy for summer dining, but it enhances the nutritional value of the salad.


The recipe makes enough salad to serve 4-6 people.


1/2 pound orzo pasta (or penne pasta)

1 medium clove garlic put through a garlic press or finely minced

2 tablespoons red wine vinegar

1 1/2 tablespoons olive oil

1 1/2 teaspoons sugar

1 teaspoon sumac (or 1/2 teaspoon paprika)

3/4 teaspoon salt, plus more to taste

3/4 teaspoon dry oregano

1/4 teaspoon black pepper

1/2 of a small red onion, thinly sliced lengthwise (julienned)

1/2 cup small cherry tomatoes, halved lengthwise

6 tablespoons pitted Kalamata olives, drained

1/4 cup sliced pickled banana peppers

2 tablespoons coarsely chopped parsley leaves (flat “Italian” type preferred)

1/4 cup crumbled feta cheese, optional


Boil the pasta in plenty of lightly salted water, stirring well after adding the pasta to the water. When just tender to the bite, drain into a sieve and rinse well with cold running water. Set aside.

In a mixing bowl combine the rest of the ingredients except the feta. Mix in the drained pasta, and mix well. Let sit for ten to fifteen minutes, mix again, and taste, If desired, add vinegar or salt to taste (generally do not add salt if salty feta cheese will be added).

 
Serve mounded slightly on a platter. Sprinkle with crumbled feta, if used.


,


 Chimichurri Sauce and Choripán

This fresh green herb sauce from Argentina and Uruguay is served on beef, sausage, grilled meat, or fish, and is special as the topping for “Choripán,” street vendor grilled sausage with crusty bread. The principal herb is parsley (flat Italian type). My version has basil and cilantro as secondary herbs, though fresh (or even dried) oregano is typically used.

Choripán

Having never been to Argentina, I first learned about this wonderful sauce when a young American couple whose wedding we catered asked for “Choripan” as an appetizer for their wedding celebration. They had met in the Peace Corps in South America, and while on a trip together to Buenas Aires decided to get married, while they were in a plaza enjoying this street vendor specialty.

The word comes from “chorizo” (sausage) and “pan” (bread), though the distinctive part of the dish is actually the green parsley and herb sauce “Chimichurri.” While a bit like Pesto, chimichurri, apparently, was created independent of that Italian basil sauce from Genoa.

The recipe makes enough sauce to serve 4-6 people.

Chimichurri

1 large shallot or 1 very small onion, peeled

1 large clove garlic, peeled

1 medium-sized bunch parsley, flat type preferred, including part of stems

1/2 cup cilantro including stems, packed

6 small fresh basil leaves

2 tablespoons olive oil

5 teaspoons lemon juice, plus to taste

Large pinch black pepper

1/2 teaspoon salt, plus to taste

Place all ingredients in food processor. Pulse to chop well. Mixture should be fine but not puréed. Transfer to bowl.

Allow sauce to rest 10 minutes. Stir and taste. Add salt and/or lemon juice to taste. Allow to marinate at least an hour. Stir and taste for salt before use. The sauce is best the first day, but can be stored refrigerated for 2-3 days.

 For Choripán

Grill mild sausage such as bratwurst, or Argentinean sausage if available, and serve it with crusty bread and some chimichurri sauce.

,


Chicken Fajitas


Fajitas [fa-HEE-tas], though having Mexican ancestry, actually emerged out of Texas in recent decades. Initially fajitas contained grilled, spice-marinated beef skirt steak, sliced thinly and rolled up in medium-sized flour tortillas. Marinated strips of chicken, or lamb or shrimp now often serve as the centerpiece.

Hearty and casual, fajitas are entertainment food. The tortillas, fried meat and vegetables, plus various condiments can be laid out buffet-style and diners assemble and roll their own fajitas.

Beyond the basic meat, tortillas and salsa or a squeeze of lime, fajitas often include refried beans, Mexican-style rice, lettuce, tomatoes, sliced green onions, canned jalapeño slices, Mexican crumbling cheese or grated Monterrey jack, avocado slices or guacamole, and sour cream. I have a posting for the salsa that my family loves in this blog on 8/26/19. It can be found in the archives by going to that month and year.

The recipe fills 4 to 6 hearty fajitas.


1 1/4 pounds boneless, skinless chicken breast

1 tablespoon freshly squeezed lime juice for marinating plus 1 tablespoon for cooking

1 teaspoon salt for marinating chicken, plus 1/4 teaspoon for cooking

4 teaspoons chili powder (or see my preferred substitute below*)

1 medium-small onion

1 medium or half a large red bell pepper

2 tablespoons olive oil for meat plus 1 tablespoon for vegetables

2 tablespoons coarsely chopped cilantro

Flour tortillas (8-inch diameter) for serving


Trim off tough or fatty parts from chicken. Slice chicken pieces crosswise into thin slices (1/4 inch). If slices are long, cut them in half. Marinate chicken 20 minutes or more with lime juice, salt and chili powder or alternative spice mixture*.

 Cut off ends then peel onion. Cut in half lengthwise and slice lengthwise (julienne) into 1/8-inch strips. Core and stem pepper. Slice lengthwise into 1/4 wide strips. Stack them up and cut them in half.

 Heat large frying pan to medium high. Add 2 tablespoons olive oil. Quickly fry marinated chicken, turning often and scraping bottom of pan. When raw color is gone, remove meat to a bowl.

 Add another tablespoon oil to pan. Fry onion and pepper, sprinkling with 1/4 teaspoon salt. Stir and fry several minutes until starting to soften.

 Add chicken back to the pan. Fry, stirring frequently, several minutes. Remove from heat. Stir in 1 tablespoon lime juice. Taste and add salt if needed. Stir in cilantro. Transfer the mixture to a serving platter.

 To serve: Place some strips of chicken plus fried onion and pepper on a flour tortilla. Optionally, add salsa, grated or crumbled cheese, seasoned beans, avocado strips, sour cream, etc., or squeeze a lime on the filling. Roll up and enjoy,


*Alternative spice mixture

2 1/4 teaspoons paprika

1/2 teaspoon oregano

1/4 teaspoon ground allspice

1/4 teaspoon black pepper

1/4 teaspoon ground cumin

1/8 teaspoon (or more) cayenne


,


                                     Coleslaw, Delicatessen-Style

 
Good-old American coleslaw hails from … (wait for it!) … Holland. “Koolsla” in Dutch is pronounced exactly like coleslaw (double “o” in Dutch sounds like the long O in “rose”). Koolsla is the shortened form of “koolsalade” -- cabbage salad.

 I make coleslaw the New York German deli way, with little mayonnaise, but tangy sweet and sour.

Any smooth-leaved green variety of cabbage seems to produce good coleslaw. Sweetness in the cabbage gets lost with all the seasonings added to it by the time the dish is completed. Savoy cabbage, though I love it for other things, in my experience doesn’t make particularly good coleslaw. Red cabbage produces a spectacular, if unorthodox, coleslaw. It serves well on a holiday buffet table. Specialty slaws for fancy and restaurant fare include slaw made from shredded Brussels sprouts.

 The recipe serves six as a side dish, with easily stored left-overs.

1 medium head of green (or red) cabbage or 3/4 of a medium-large head
1 medium-large carrot
2 tablespoons mayonnaise (“real” preferred)
1 tablespoon Dijon-style mustard
6 tablespoons white vinegar
4 tablespoons sugar
1-1/2 teaspoons salt, plus more to taste

1/4 teaspoon ground black pepper


Discard any tough outer cabbage leaves. Cut off cabbage’s bottom inch. Cut the head in half through the stem and cut it again into quarters. Set a quarter on a board and cut away the core and any big ribs on the exterior.

 Shred cabbage finely crosswise, either with a sharp knife on a cutting board, with a mandolin slicer, or in a food processor fitted with a 2-millimeter slicer blade. As you shred it, place cabbage in a very large bowl for mixing.

 Peel carrot and shred it, using the coarse side of a grater or the food processor fitted with a grater blade. Add it to the cabbage.

 Add mayonnaise, mustard, vinegar, sugar, salt and pepper. Mix well. It will be dry at first. Let it sit 15 or 20 minutes, mixing from time to time, until the cabbage softens and the juices increase. Taste and adjust salt, vinegar or sugar as desired.

 Coleslaw is best if allowed to chill for an hour or more, or even up to several days, covered. Mix well and taste before serving and adjust salt, vinegar or sugar if needed. 

,


Pad Thai Noodles


I’ve been slow on getting recipes onto my blog during the Covid pandemic, since I’ve been cooking virtually every day at the family restaurant, Donderos’ Kitchen here in Athens. Casual cooking for family and friends, as well as teaching cooking, which often lead to blog posts, have been off for over a year. But I’ll try to get back into the habit, especially now that the hits on the blog have increased appreciably. I’ll start back up with a family favorite, pad thai noodles.


Pad Thai noodles,, without shrimp
Pad Thai noodles, non-shrimp version
This exciting concoction of rice noodles fried sweet and sour with shrimp, tofu, pork (I sometimes substitute chicken), bean sprouts and toasted peanuts, is thought by some Westerners to be a Thai national dish. In fact, pad thai, meaning fried in the Thai manner, is street vendor food that is whipped up fresh and served for lunch or snack. And it is only forty or fifty years old and not part of traditional Thai cuisine. My wife, Christina, grew up in Bangkok, and did not even see this dish until she was an adult. Because pad thai is typically a light meal in itself, it, like most noodle dishes, is not usually included in a Thai dinner.


The recipe serves six.

 1/2 pound Thai dry flat rice noodles, 1/8-inch wide

2 eggs, beaten

12 fresh shrimp, peeled, deveined, tail shells left on (optional, increasing the meat if not using)

1/2 pound raw chicken breast or pork, thinly sliced

1/2 of a (1-pound) cake of tofu, firm style, in 1/2-inch cubes

3 large cloves garlic, finely chopped

3 scallions, including most of the green part, diagonally sliced 1/2 inch long

5 tablespoons peanuts (dry roasted), crushed or chopped slightly

2 cups fresh bean sprouts, rinsed

3 tablespoons coarsely chopped fresh cilantro (coriander) leaves

4 tablespoons freshly squeezed lime juice

4 tablespoons Asian fish sauce (available in Asian groceries)

4 tablespoons palm or brown sugar

1/2 teaspoon ground red toasted pepper or 1/4 teaspoon cayenne plus 1/4 teaspoon paprika

3-4 tablespoons vegetable oil (not olive oil)

1 red chili pepper, seeds removed, shredded or 1/2 teaspoon roasted Thai pepper flakes)

Lime wedges plus several sprigs of cilantro (coriander) leaves for garnish


Break noodles into 4-inch lengths. Soak in warm water at least 20 minutes, until softened. Drain. Beat eggs in a small bowl. Prepare the other ingredients from shrimp through cilantro leaves and set out in separate piles on a platter before cooking. Mix lime juice, fish sauce, sugar, and toasted red pepper, or cayenne plus paprika, in a small bowl.


Heat oil in a wok or large frying pan and gently stir-fry the garlic until pale golden. Add chicken or pork and increase heat and stir-fry until color is almost changed. Add shrimp, if used, and continue to stir-fry just until shrimp turn bright pink. Add the tofu. Stir and fry 15 seconds. Add lime juice mixture, stirring briefly to dissolve.


Add drained noodles and stir through the mixture 20-30 seconds (the noodles should start to become tender). Push noodles to one side in the wok. Add a little oil to the emptied part of the pan, and pour in beaten eggs. As they set, gently scramble them, keeping them separate from the noodles. Place most of the bean sprouts and scallions plus half the peanuts and chopped cilantro on the noodles. Stir these and the scrambled eggs throughout the noodles. Taste a noodle, and add fish sauce or salt if needed.


Serve immediately on a large plate or platter, sprinkling on the remaining bean sprouts, peanuts, scallions, chopped cilantro leaf, and red pepper or pepper flakes. Garnish with lime wedges plus several sprigs of cilantro. Diners should squeeze a little lime juice on their noodles.

,


Fruitcake Bars – A Relatively Easy Family Favorite Treat


Here, after the holidays, as we eat the last of this season’s fruitcake bars, I realized I should get the recipe onto the blog so that family, and others who might be interested, can access it. I didn’t want to risk misplacing it, as happened for several years with our Lekerli recipe (see my blog post of December 6, 2020).

Although fruitcake is, or at least was, very common around the holidays, and I loved it, it was complex and tedious to make, wrap, and cure over weeks with rum or brandy or bourbon. Worse yet, it wasn’t very well liked by many people, such that it suffered from the joke about there being only one actual loaf of fruitcake in the world and it kept being re-gifted and passed around.

Many years ago on short notice just before Christmas I was asked to make a holiday food item for my wife’s church choir pot-luck brunch. Traditional fruitcake was out of the question because of the time needed to make and age it. The choir event was the next day. I worked with what we had in the kitchen and threw together a heavy, fruit and nut-packed batter and baked it in a sheet cake pan. I cut the cake into bars, sprinkled them with bourbon and arranged them on a platter, and off they went to church. The approach used several of the tricks of making classical fruitcake that I had learned from my mother as well as numerous shortcuts. Finally, and subversively, I used liquor in it for a church that then still frowned on drinking. The bars were a hit. Ever since, and with a few modifications to the recipe, my wife or I have made our Fruitcake Bars almost every year. There are extended family members and several friends who wait eagerly for this annual Christmas treat. 

In a pan on the stove, heat together to moisten the fruit, then set aside:
1 1/2 cups golden (“sultana”) raisins
1 1/2 cups black raisins (Monukka, Muscat or “large green” if available)
1/2 cup bourbon or rum
 
In a large bowl cream together by hand:
1/4 cup butter
1/2 cup light brown sugar
 
Beat in:
2 eggs
 
Add and mix in well:
1 1/2 cups flour
1 teaspoon baking soda
1 1/2 teaspoons cinnamon
1 teaspoon ground allspice
1/2 teaspoon nutmeg (fresh grated is best)
 
Add and mix in well, using a wooden spoon:
1 1/2 cups coarsely chopped or broken pecans
1/2 cup candied cherries, cut up
1/2 cup candied pineapple pieces
1/2 cup candied citron
1/2 cup candied orange rind
1/2 cup dried apricots, coarsely chopped
1/2 cup pitted prunes, coarsely chopped
The prepared raisins
 
Grease a 9x13 inch pan or 2 8-inch square pans. With wet hands, press the dough into the pan(s). Bang the pan(s) on a hard surface several times to force out bubbles.
 
Heat oven to 315 degrees and place a pan containing boiling water on the lower shelf. Bake the fruitcake for about 45 minutes, or until the center springs back when you push on it with your finger.
 
Cool cake in the pan overnight with a clean towel covering it. With a sharp knife, cut cake into 1-inch squares or 1/2 by 1 1/2 inch rectangles.
 
Store in tightly covered tins lined with bourbon or rum-soaked paper towels. Place more soaked paper towels between layers of bars and on top. Store at room temperature. After a few days, sprinkle with 1-2 tablespoons bourbon or rum, and repeat this several days apart until towel stays slightly moist. The fruitcake bars keep well for weeks.
 

Note, if avoiding the use of liquor to wrap the bars (that in the raisins will have cooked off during baking), store the container with the bars in the refrigerator.

Follow Us @donderoskitchen